
Hey there! In my last post, I shared why I’m starting this homelab journey. Today I’m taking it a step further: I’m rebuilding my home network from a simple, flat LAN into a segmented, security‑first setup … very similar to how Google Cloud designs hub‑and‑spoke networks. If you’re new here, you might want to start with my introduction: Why not a homelab?
Why hub‑and‑spoke here (a note from the field)#
Recently, I designed and deployed a hub-and-spoke network on GCP for a production platform. We manually configured multiple VPCs to connect to a central hub VPC for shared services and egress traffic, using VPC peering and custom route tables. That experience heavily influenced this homelab plan. I’m borrowing the same separation of concerns and security boundaries … just scaled down to switches, VLANs, OPNsense, and Pi-hole.
This is my blueprint: clear boundaries, default‑deny, and observable traffic flows, but simplified for a home environment.
Why change anything at home?#
My old setup worked, but it was a classic flat network: one big broadcast domain with minimal control where my work laptop, smart TV, and Unraid NAS all sat in the same logical space. It’s simple, but it offers zero internal segmentation.
I wanted to bring the skills I use at work into my home. This redesign is my chance to get hands-on with enterprise practices like network segmentation, Zero Trust policies, and building a resilient platform for virtualization (Proxmox) and container orchestration (Kubernetes). The goal is cleaner security, better performance, and a solid foundation for all the projects I plan to run.
The “Before”: A Classic Flat Home Network#
My current setup is probably familiar: a single flat network where every device (my laptop, the TV, my Unraid NAS, IoT gadgets) lives on the same LAN provided by the ISP router. It works, but it’s a free-for-all. Minimal segmentation, basic firewalling, and zero real control.
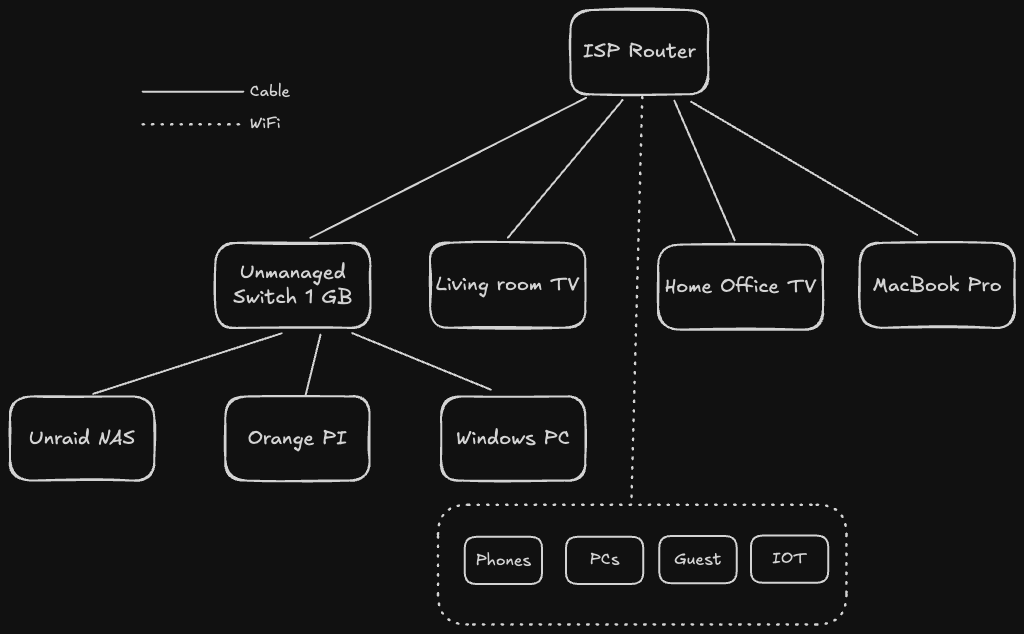
Key characteristics:
- Single Point of Failure & Trust: The ISP router handles everything: gateway, firewall, DHCP, and DNS.
- No Internal Boundaries: Every device can see every other device. A compromised IoT device could potentially access my NAS.
- Limited Visibility: I have almost no insight into what traffic is flowing between devices.
The “After”: A Multi-Layer, Enterprise-Inspired Network#
The new design introduces layers of control, intentionally mimicking the hub-and-spoke model I use in the cloud. At the heart is an OPNsense firewall, a managed switch for VLANs, and a dedicated DNS filtering layer with Pi-hole. This creates a strong foundation for my Proxmox and Kubernetes clusters.
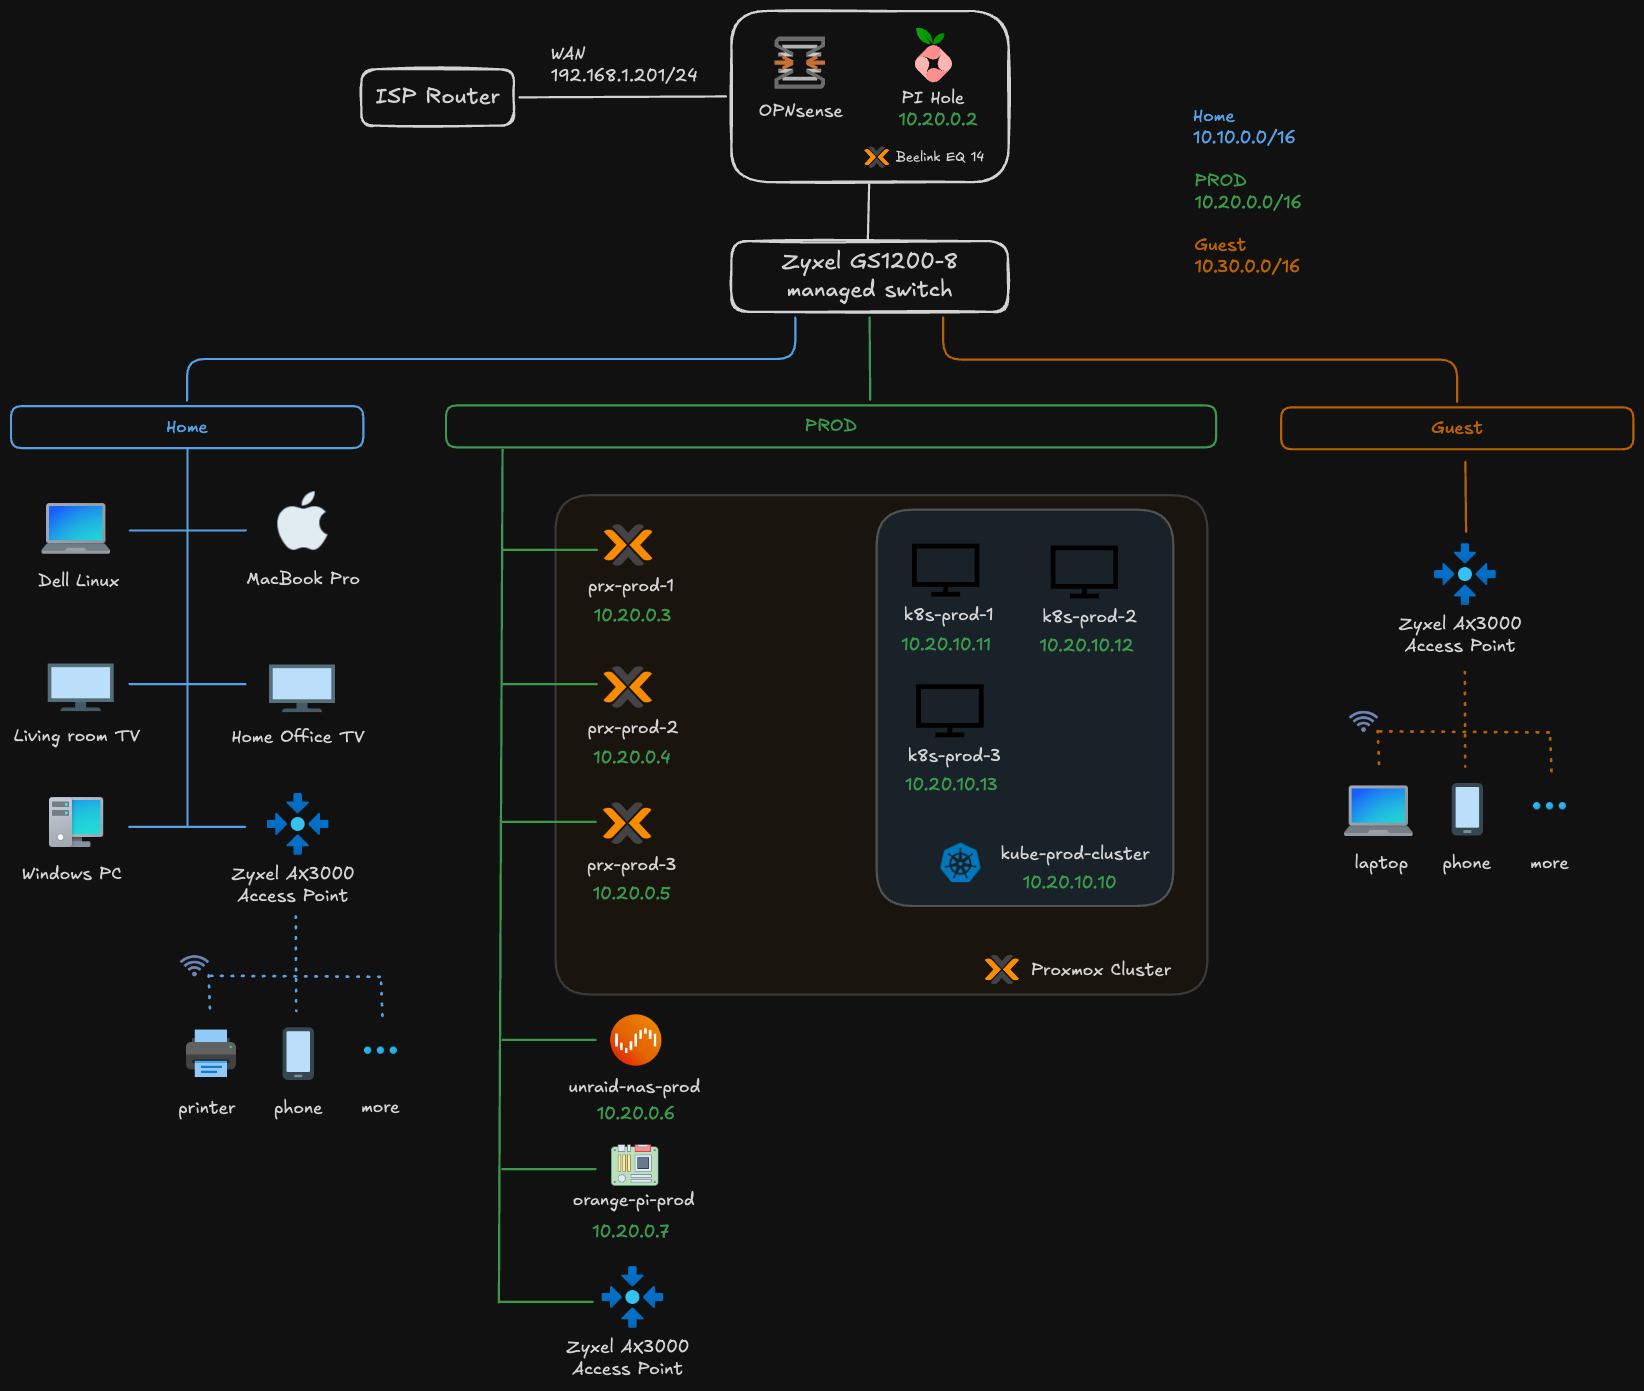
Highlights:
- Edge Security: OPNsense becomes the single point of entry and exit, handling stateful firewalling, VPN, and even IDS/IPS.
- Internal Segmentation: The managed switch creates VLANs, and OPNsense enforces rules for all traffic between them.
- Centralized DNS: Pi-hole provides network-wide ad-blocking and allows me to create internal-only DNS records.
- Dedicated Compute & Wireless: Proxmox provides a resilient compute layer, while a single VLAN-aware access point will broadcast different SSIDs for each VLAN, extending the segmentation to wireless devices.
Side‑by‑side: Before vs After#
| Area | Before (Flat) | After (Enterprise‑style) |
|---|---|---|
| Segmentation | Single LAN | VLANs: Home, Prod, Guest |
| Security | Basic ISP firewall | Defense‑in‑depth, Zero Trust, IDS/IPS |
| DNS | ISP default | Pi‑hole filtering + local overrides |
| Routing | NAT on ISP router | Centralized on OPNsense with per‑VLAN rules |
| Compute | Bare devices | Proxmox cluster + Kubernetes |
| WiFi | Single SSID | Multiple SSIDs mapped to VLANs |
| Observability | Minimal | Dashboards (OPNsense, Prometheus/Grafana, K8s) |
| Resilience | Many SPOFs | HA patterns (Proxmox quorum, K8s replicas) |
How this maps to GCP hub‑and‑spoke#
This design mirrors how cloud networks separate concerns and enforce policy.
| My Home Network | GCP Equivalent | Function |
|---|---|---|
| OPNsense Firewall | Cloud Armor + Cloud NAT | Edge security and egress NAT |
| OPNsense as routing hub | Network Connectivity Center Hub | Central routing/control plane |
| Pi‑hole DNS | Cloud DNS + Private DNS Zones | Split‑horizon, policy‑aware DNS |
| Zyxel Managed Switch | VPC Network | Core fabric enabling segmentation |
| VLANs (Home/Prod/Guest) | VPC Subnets | Isolation boundaries |
| Inter‑VLAN policy | VPC Peering / Shared VPC + Firewall Rules | Controlled east‑west traffic |
| Proxmox Cluster | Compute Engine / GKE Autopilot | HA compute substrate |
| Kubernetes Cluster | Google Kubernetes Engine (GKE) | Container orchestration |
| Unraid NAS | Filestore / Cloud Storage | Persistent storage |
| APs + SSIDs | Interconnect/VPN endpoints | Access edges into the fabric |
| ISP Router WAN | Cloud Router + Cloud NAT | Internet ingress/egress |
Note: It’s an analogy, not a 1:1 feature match, but the architectural patterns align.
What I have today (gear & constraints)#
This is a network plan. I don’t have the full setup yet, and that’s fine … I’ll start small:
- Beelink Mini PC with 2 NICs: will run Proxmox; OPNsense will be virtualized with one NIC for WAN and one for LAN/trunk
- Zyxel 8-port managed switch: VLANs, trunk to Proxmox/OPNsense, access ports for test devices
- Zyxel AX3000 Access Point: A single AP connected to the managed switch. It will be configured with multiple SSIDs, each tagging traffic onto the corresponding VLAN (e.g., “Home-WiFi” on VLAN 10, “Guest-WiFi” on VLAN 30).
- Orange Pi: utility node to validate VLAN reachability and services
- Pi-hole: will run as a VM/LXC; DNS for Home/Prod VLANs with filtering
This minimal kit is perfect for a “router on a stick” setup. Here’s the high-level technical plan: the practical details for OPNsense, the switch, and the AP will get their own dedicated posts as I build this out.
- Proxmox Networking: The Beelink’s first NIC (eth0) will be passed directly to the OPNsense VM for the WAN connection. The second NIC (eth1) will be configured as a Linux bridge in Proxmox (
vmbr0) and act as a VLAN trunk port. - OPNsense VM: The VM will have two virtual NICs. The first (
vtnet0) connects to the WAN. The second (vtnet1) connects tovmbr0and will be configured as the LAN interface, tagged with all the VLANs (Home, Prod, Guest). OPNsense will handle all inter-VLAN routing. - Switch and AP Configuration: One port on the Zyxel switch will be a trunk port connected to the Proxmox host’s
eth1. Another port will connect to the Zyxel Access Point, also configured as a trunk to carry all VLANs. The remaining ports will be access ports for wired devices. - A Note on Wireless DHCP: It’s critical to have only one DHCP server per VLAN. OPNsense will handle all DHCP for both wired and wireless clients. The access point must be configured to bridge the wireless SSIDs to their respective VLANs and must not run its own DHCP server. This ensures that a device connecting to the “Home-WiFi” SSID gets an IP address from the same
10.10.0.0/16pool as a wired device on VLAN 10.
This setup lets me validate the entire architecture: VLAN segmentation, DHCP/DNS per VLAN, and firewall rules (before I invest in more hardware).
IP/VLAN Plan at a Glance#
| VLAN ID | Name | Subnet | Gateway | Purpose |
|---|---|---|---|---|
| 10 | Home | 10.10.0.0/16 | 10.10.0.1 | Trusted devices: laptops, phones, NAS |
| 20 | Prod | 10.20.0.0/16 | 10.20.0.1 | K8s nodes, servers, infrastructure |
| 30 | Guest | 10.30.0.0/16 | 10.30.0.1 | Untrusted devices, visitors, IoT |
| - | Edge | 192.168.1.0/24 | ISP Router | ISP-facing network (untrusted) |
Security Patterns Baked In#
- Zero Trust: Default-deny between VLANs. Only explicitly allowed traffic can pass.
- Defense in Depth:
- Layer 1: ISP router provides a basic first line of defense.
- Layer 2: OPNsense acts as a stateful firewall with IDS/IPS capabilities.
- Layer 3: VLANs provide network segmentation.
- Layer 4: Pi-hole filters DNS requests, blocking malicious domains.
- Layer 5: Application-level controls within Kubernetes (e.g., NetworkPolicies).
- Least Privilege: Services are only granted the network access they absolutely need (e.g., only the Prod VLAN can access the NAS backup ports).
- Encrypted Remote Access: For secure remote access, I’m weighing my options. I could use a traditional VPN server like WireGuard or OpenVPN on OPNsense for broad network access. However, I’m also considering extending my use of Twingate, which I currently use for my NAS. Twingate is a Zero Trust Network Access (ZTNA) solution that provides secure, direct access to specific applications without exposing the entire network … a model that aligns perfectly with the security principles of this new design. A dedicated post on this topic will surely follow.
Final Thoughts: It’s a Journey#
This isn’t just about a fancy home network. It’s a project. It’s about bringing the discipline I use in production (segmentation, least privilege, and observability), into an environment I can touch and experiment with freely. The hub-and-spoke analogy isn’t just for show; it’s a mental model that helps me reason about boundaries, traffic flow, and ownership.
Yes, this design adds complexity over a simple flat network, but that complexity is where the learning happens. It turns my homelab into a true-to-life platform for mastering Proxmox, Kubernetes, and security practices that directly mirror what I build for a living.
I hope this post clearly outlines my vision for this network transformation. Subsequent articles in this series will document the implementation details, including OPNsense rule configurations, Pi-hole DNS management, and VLAN-to-SSID mapping. I’ll also be sharing the challenges encountered and the solutions I discovered along the way.
Stay tuned. Andrei